Summary
ArgoCD is a declarative GitOps continuous delivery tool for Kubernetes. This guide walks you through deploying a production-ready ArgoCD setup on AWS using best practices for security, scalability, and maintainability. Key highlights include:
- Domain Setup: Purchase and configure a custom domain for your ArgoCD instance.
- AWS ALB: Deploy an Application Load Balancer to expose ArgoCD externally and terminate SSL using ACM certificates.
- SSL Certificates: Use AWS Certificate Manager to create public certificates and attach them to the ALB for secure HTTPS access.
- DNS Configuration: Map your domain to the ALB using A/CNAME records, enabling users to reach ArgoCD via a friendly URL.
- Kubernetes Ingress & Traefik: Use an Ingress controller to route traffic from the ALB to ArgoCD services inside the cluster.
- Automated ALB Configuration: Configure ALB and SSL certificates via Kubernetes ingress annotations, allowing the AWS Load Balancer Controller to manage resources automatically.
- Production Considerations: Ensure proper namespace isolation, resource limits, RBAC policies, and monitoring for a secure and scalable ArgoCD deployment.
Following this setup ensures your ArgoCD instance is accessible over HTTPS, fully managed via AWS services, and ready for production GitOps workflows.
Pre-requisites
- Kubernetes cluster
- Kubectl
- Helm
- AWS ALB
- Ingress controller
Step-1: Purchase your Domain
Before setting up SSL and ALB, you need a domain name for your ArgoCD dashboard (e.g., argocd.example.com).
- Go to a domain registrar such as Amazon Route 53, Namecheap, GoDaddy, or Google Domains.
- Search for an available domain name you want to use.
- Purchase the domain through the registrar.
- Note the domain name and ensure you can manage its DNS records (important for pointing it to the ALB later).
If you are using AWS Route 53, you can create a hosted zone for your domain. This makes it easier to configure DNS records for AWS services like ALB and ACM.
Step 2: Create SSL Certificates in ACM
Now that we have an ALB, we need a secure certificate to enable HTTPS. We’ll use AWS Certificate Manager (ACM) to create a free public certificate for our domain.
- Go to the AWS Management Console → Certificate Manager → Provision Certificates → Request a Public Certificate.
- Enter your domain name, for example:
argocd.example.com. - Choose DNS Validation (recommended) or Email Validation.
- If using DNS validation:
- ACM provides a CNAME record to add to your DNS (Route 53 or external provider).
- Once added, ACM validates the domain and issues the certificate.
- After issuance, copy the ARN of the certificate. It will look like:
arn:aws:acm:region:account:certificate/xxxxxxxx-xxxx-xxxx-xxxx-xxxxxxxxxxxx.
This certificate will later be attached to the ALB via Kubernetes ingress annotations so that all traffic to argocd.example.com is encrypted.
Step-3: Create ALB
To expose ArgoCD securely outside your EKS cluster, we first create an AWS Application Load Balancer (ALB). The ALB will handle HTTPS traffic and forward requests to your Traefik ingress controller.
- Ensure you have AWS CLI configured and your EKS cluster is running.
- Install the AWS Load Balancer Controller in your cluster if not already installed. This controller automatically provisions ALBs for Kubernetes ingress resources.
Install AWS Load Balancer Controller via Helm
# Add EKS Helm repository
helm repo add eks https://aws.github.io/eks-charts
helm repo update

# Install the CRDs
kubectl apply -k "github.com/aws/eks-charts/stable/aws-load-balancer-controller//crds?ref=master"

# Install the AWS Load Balancer Controller (replace cluster name, region, and VPC ID)
helm install aws-load-balancer-controller eks/aws-load-balancer-controller \
  -n kube-system \
  --set clusterName= \
  --set serviceAccount.create=false \
  --set region= \
  --set vpcId= \
  --set serviceAccount.name=aws-load-balancer-controller
Once installed, the controller can automatically create an ALB whenever you define a Kubernetes Ingress resource annotated for ALB.
IMP: ALB controller will watch the ingress controller, since the ingress controller has the annotations of the certificate, ALB will do SSL termination based on that
Steps-4: Install Traefik Ingress Controller
An Ingress controller provides a secure and manageable way to access Applications from outside the Kubernetes cluster. By using an Ingress, you can expose your application on a custom domain, enable HTTPS with TLS certificates, and apply security rules such as IP whitelisting or authentication middleware. It also simplifies scaling and maintenance by unifying access to multiple services, supports SSO and OAuth redirects, and avoids relying on less secure or temporary methods like port-forwarding or NodePort services. Overall, an Ingress controller ensures that the Application is both accessible and secure for production environments.
Create Namespace
Create a dedicated namespace for Traefik:
kubectl create namespace traefik
Add & Update Helm Repository
Traefik provides an official Helm chart repository:
helm repo add traefik https://traefik.github.io/charts
helm repo update
Download Traefik Helm Chart
To download a specific version of the Traefik Helm chart for offline installation or customization, fetch the .tgz chart package:
# Download specific version (tgz file)
helm pull traefik/traefik --version 26.0.0
This will download a file like:
traefik-26.0.0.tgz
Install Traefik Using the Local Chart
Now install Traefik from the local Helm chart file:
helm install traefik ./traefik-26.0.0.tgz -n traefik
If you want to apply a custom configuration using values.yaml:
helm install traefik ./traefik-26.0.0.tgz -n traefik -f values.yaml
Step-5: Install ArgoCD
Download ArgoCD Helm Chart
If you want to download a specific version of the ArgoCD Helm chart for review or customization before installation, use helm pull
# Add Argo Helm repo
helm repo add argo https://argoproj.github.io/argo-helm
helm repo update

# Download (fetch) a specific version of the ArgoCD Helm chart
helm pull argo/argo-cd --version 5.53.7
Replace 5.53.7 with any version you prefer.
Create Namespace
Create a dedicated namespace for ArgoCD:
kubectl create namespace argocd
Production Configuration
For production environments, ArgoCD should be configured with additional security, scalability, and reliability settings.
Below are the recommended adjustments when deploying with Helm:
Extract the helm chart using you have downloaded & Create a file values-production.yaml which is a copy of the argocd helm chart values.yaml
tar -xvf argo-cd-5.53.7.tgz
cp argo-cd/values.yaml values-production.yaml
1. Enable Ingress for External Access
Create a stable entry point for the ArgoCD UI and API: (Add ALB annotations)
# values-production.yaml
server:
  ingress:
    enabled: true
    # Use alb ingress class
    ingressClassName: alb
    hosts:
      - argocd.example.com
    annotations:
      # AWS ALB-specific annotations
      kubernetes.io/ingress.class: alb
      alb.ingress.kubernetes.io/scheme: internet-facing
      alb.ingress.kubernetes.io/listen-ports: '[{"HTTP":80},{"HTTPS":443}]'
      alb.ingress.kubernetes.io/certificate-arn: <YOUR_ACM_CERTIFICATE_ARN>
      alb.ingress.kubernetes.io/ssl-redirect: '443'
    pathType: Prefix
    tls:
      - hosts:
          - argocd.example.com
        secretName: argocd-tls-secret # optional if you want a k8s secret, ALB can use ACM directly
2. Configure External Authentication (SSO)
You can integrate ArgoCD with OAuth2, GitHub, Google, SAML, or Dex:
# values-production.yaml
configs:
  cm:
    url: https://argocd.example.com
  dex:
    config: |
      connectors:
      - type: github
        id: github
        name: GitHub
        config:
          clientID: $GITHUB_CLIENT_ID
          clientSecret: $GITHUB_CLIENT_SECRET
          orgs:
            - your-org
3. Enable High Availability (HA)
Run multiple replicas for core components:
# values-production.yaml
controller:
  replicas: 3

repoServer:
  replicas: 3

server:
  replicas: 3
4. Add Resource Limits
Prevent resource exhaustion and ensure stability:
# values-production.yaml
controller:
  resources:
    requests:
      cpu: 250m
      memory: 512Mi
    limits:
      cpu: 1
      memory: 1Gi
5. Enable RBAC Policies
Set user roles and restrict permissions:
configs:
  rbac:
    policy.csv: |
      p, role:readonly, applications, get, *, allow
      p, role:admin, *, *, *, allow
    scopes: "[groups]"
6. Enable Redis HA (Recommended)
# values-production.yaml
redis-ha:
  enabled: true
7. Apply All Production Settings with Helm
Install ArgoCD with the production values file:
helm install argocd ./argo-cd-5.53.7.tgz -n argocd -f values-production.yaml
That’s it! With these production-grade configurations, your ArgoCD installation becomes secure, scalable, and ready for enterprise workloads.
Verify Installation
Check that all ArgoCD pods are running:
kubectl get pods -n argocd
Access UI via Port-forward
By default, the ArgoCD API server is created as a ClusterIP service.
To access it locally, use port-forwarding:
kubectl port-forward svc/argocd-server -n argocd 8080:443
Now open the UI:
- URL: https://localhost:8080
- Username: admin
Fetch the initial admin password:
kubectl get secret argocd-initial-admin-secret -n argocd \
  -o jsonpath="{.data.password}" | base64 -d
You can now log in to the ArgoCD dashboard and begin deploying applications using GitOps workflows.
Access UI via Domain
Now open the UI:
- URL: https://argocd.example.com
- Username: admin
Fetch the initial admin password:
kubectl get secret argocd-initial-admin-secret -n argocd \
  -o jsonpath="{.data.password}" | base64 -d
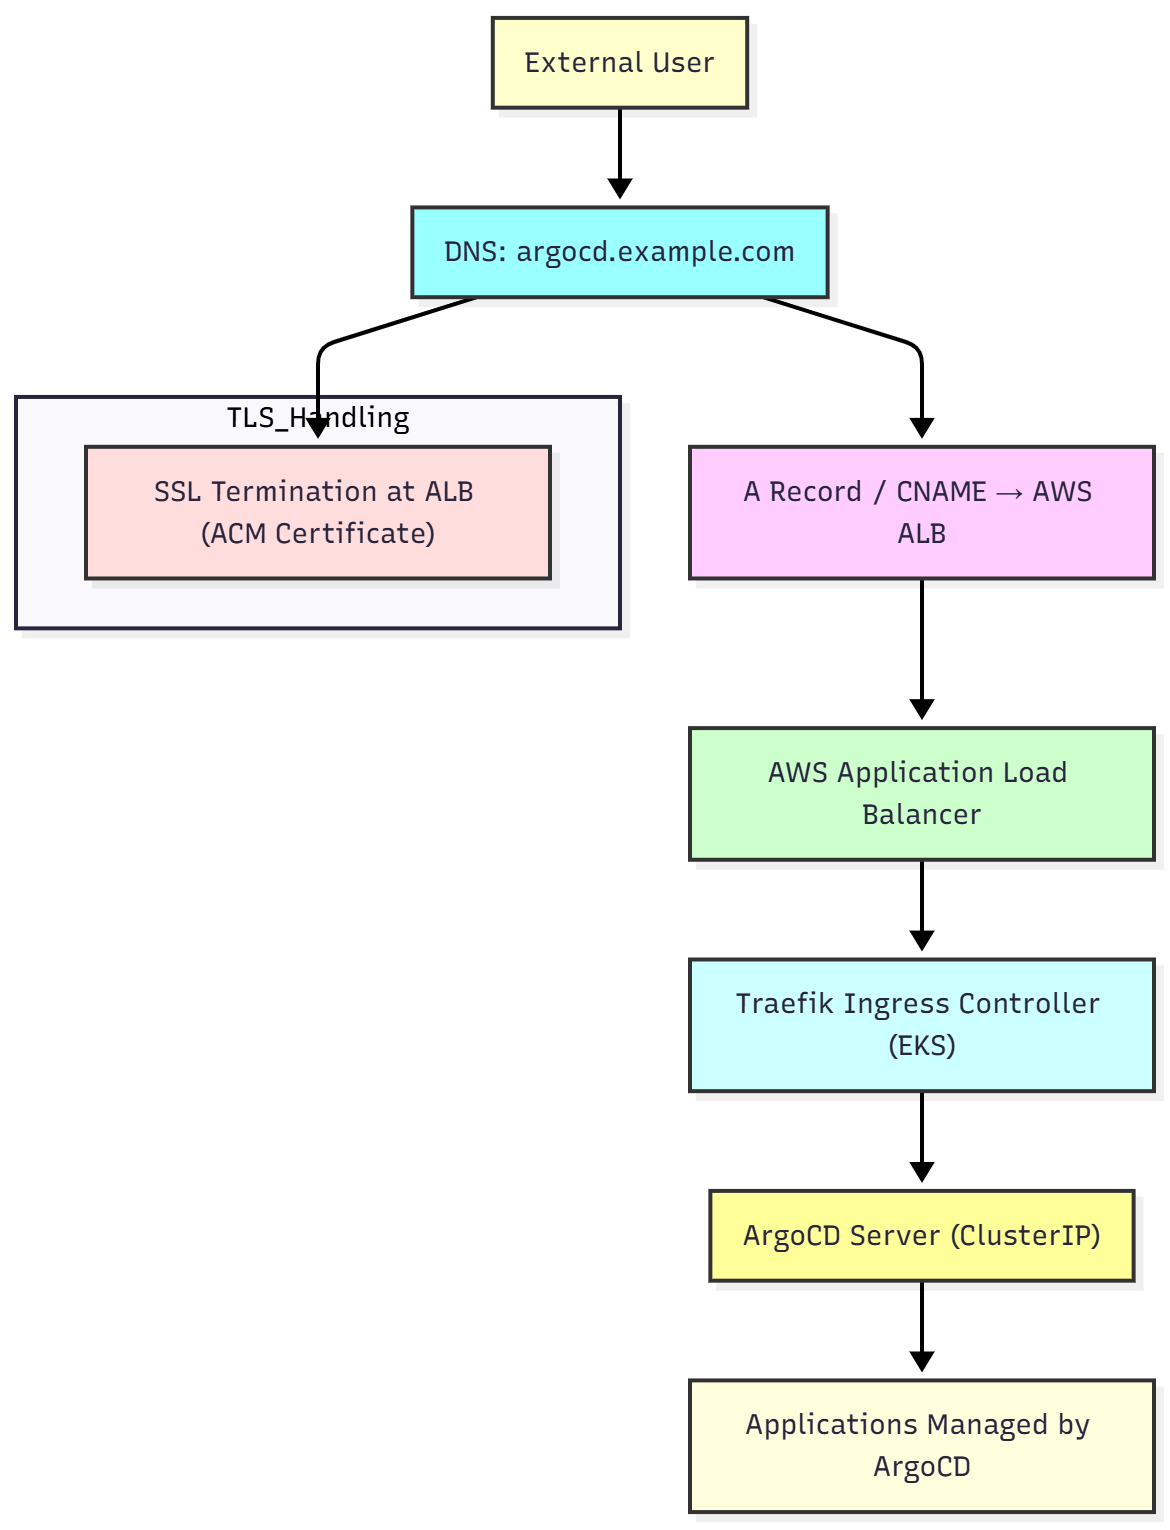
Mermaid
The following code is just for reference of the flow chart
%% Mermaid diagram: Domain mapping with ALB and Traefik to ArgoCD
flowchart TB
    A["External User"] --> B["DNS: argocd.example.com"]
    B --> C["A Record / CNAME → AWS ALB"]
    C --> D["AWS Application Load Balancer"]
    D --> E["Traefik Ingress Controller (EKS)"]
    E --> F["ArgoCD Server (ClusterIP)"]
    F --> G["Applications Managed by ArgoCD"]

    subgraph TLS_Handling
        H["SSL Termination at ALB (ACM Certificate)"]
    end

    B --> H

    style A fill:#ffc,stroke:#333,stroke-width:2px
    style B fill:#9ff,stroke:#333,stroke-width:2px
    style C fill:#fcf,stroke:#333,stroke-width:2px
    style D fill:#cfc,stroke:#333,stroke-width:2px
    style E fill:#cff,stroke:#333,stroke-width:2px
    style F fill:#ff9,stroke:#333,stroke-width:2px
    style G fill:#ffd,stroke:#333,stroke-width:2px
    style H fill:#fdd,stroke:#333,stroke-width:2px